Building a Bird House
by Joe Camelon

With our busy lives today, sometimes we Dads find it difficult to find time to share with our children. It seems that meal-time and bed-time are the only occasions we have a moment together to catch up on the events of the day.
One way I have found to spend time with my children is to build something with them. The questioning vocabulary, the joyful eyes and the anticipation in the air make it very rewarding.
Building a birdhouse may seem quite a task, but it really only takes an hour or so of your time if you familiarize yourself with the project before hand. Start by acquiring either a 4 foot piece of 1x7 pine or a 2 by 2 foot piece of half-inch plywood. A table saw or circular saw makes the job easier, but it can be handled quite well with a hand saw.
Be sure to include the children in this part. They will have just as many questions during the preparation as in the actual building (if that is possible). Just remember safety first. Children should not handle power tools.
Cut out the parts according to the following plan.
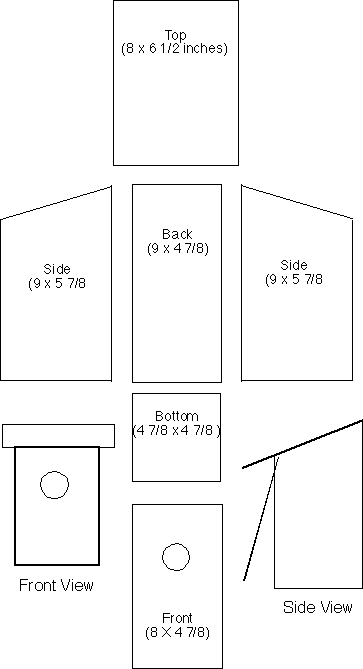
After cutting out all the pieces (allowing for an 1/8 saw kerf), collect 2 dozen nails (1.5 inch common) and get ready to begin.
1) First attach the back to the bottom using 3 nails from
the back into the bottom edge. Be careful to centre the
nails so as not to split the bottom. A few points to
remember here.
a) It doesn't need to be perfect.
Let the children do it, you can hammer one with them or
do one later.
b) If the nail splits the wood, as
long as it is secure the birds don't really care.
c) If the house does not turn out perfect, its
distinguishing features make it easier for the bird to
tell its house from all the others.
2) Next fasten the sides to the bottom and back using 6 more nails each. Be sure the slope of the sides is down to the front.
3) Now we need to drill the hole for the bird's entrance. A 1.5 inch diameter hole, 6 inches from the base of the house is best for a blue bird. Again, let the child drill the hole (with supervision). Be sure the board is clamped down securely before starting to drill.
4) After the hole is drilled, fasten the front of the house to the sides using a single nail at the top of each side. This allows the front to swing open from the bottom for easy cleaning (done every fall)
5) Finally fasten the roof in place using the remaining nails. It should be flush with the back of the house, allowing for mounting on a tree or post and giving maximum overhang on the front. You may paint your house if you wish, but should probably avoid painting the inside
Now, sit back and admire your child's abilities. Sometime in March or April, take another hour with your child and place the house where a bird might enjoy it. Project like this one are very rewarding if we take the time for them.
Most libraries have a good selection of birdhouse books and plans, so why not visit one and build your own birdhouse some day soon? Your children will remember these experiences forever and probably you will too.
Return to Fridge Art Page.